

Railing installation is a critical component of any home improvement or construction project, whether you’re building a new deck, stairway, or balcony. Railings not only enhance the aesthetic appeal of your home but also provide an essential layer of safety. In this article, we will dive deep into the process of railing installation, the various types of railings available, and the key considerations you should keep in mind to ensure a successful installation.
Why Railing Installation is Important
Before delving into the steps of railing installation, it’s essential to understand why railings are a necessary feature for homes and buildings. Properly installed railings provide several benefits:
- Safety: The primary purpose of railings is to prevent accidents, especially around elevated spaces like decks, balconies, and stairs. They act as a barrier to prevent falls, making them essential for childproofing and ensuring the safety of all family members and guests.
- Aesthetic Appeal: Railings come in various designs, materials, and finishes, allowing homeowners to select options that enhance the visual appeal of their home. Whether you’re looking for a sleek, modern design or a traditional look, railings can complement the architectural style of your home.
- Property Value: Well-installed and well-maintained railings contribute to the overall value of your property. They create a polished and complete appearance, making your home more appealing to potential buyers or renters.
- Compliance with Building Codes: Most local building codes require railings for specific structures like decks and stairs. By ensuring proper railing installation, you are complying with safety regulations, which can save you from potential fines and liabilities.
Types of Railings for Your Home
Before you begin the installation process, it’s important to choose the type of railing that best suits your project. The choice of material will influence the cost, maintenance, and longevity of your railing system.
1. Wood Railings
Wood railings are a classic choice for both indoor and outdoor applications. They are popular for their natural beauty and ability to blend seamlessly with various architectural styles.
Pros:
- Aesthetic flexibility: Can be stained or painted in different colors.
- Works well with traditional and rustic home designs.
- Relatively easy to install.
Cons:
- Requires regular maintenance (sealing, staining, or painting) to protect against weathering.
- Prone to warping, cracking, and rotting over time, especially when exposed to moisture.
2. Metal Railings
Metal railings, such as those made from steel, aluminum, or wrought iron, are known for their durability and strength.
Pros:
- Highly durable and resistant to wear and tear.
- Low maintenance: Aluminum and steel are resistant to rust.
- Available in modern and ornate designs.
Cons:
- Metal railings can be more expensive than wood.
- Wrought iron may require periodic maintenance to prevent rusting.
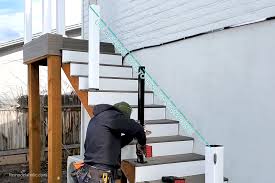
3. Glass Railings
Glass railings offer a modern and minimalist look that enhances the view from decks and balconies.
Pros:
- Provides an unobstructed view, perfect for scenic locations.
- Modern and sleek appearance.
- Requires minimal maintenance; glass panels are easy to clean.
Cons:
- Can be more expensive to install than other materials.
- Glass can break or chip if not properly installed.
4. Cable Railings
Cable railings are becoming increasingly popular in modern architecture due to their minimalist look and low maintenance needs.
Pros:
- Provides a nearly transparent barrier, allowing for an unobstructed view.
- Modern aesthetic, perfect for contemporary homes.
- Easy to maintain, with cables that are durable and resistant to weathering.
Cons:
- Installation can be more complex compared to other types.
- May not suit all architectural styles.
5. Composite Railings
Composite materials, made from a mixture of wood fibers and plastic, are designed to mimic the appearance of wood while offering greater durability.
Pros:
- Low maintenance compared to wood; resistant to rot, insects, and fading.
- Available in a range of colors and styles.
- More environmentally friendly as they often use recycled materials.
Cons:
- Can be more expensive than traditional wood railings.
- Limited color options compared to wood that can be painted or stained.
Steps for Installing a Railing System
Now that we’ve reviewed the different types of railings, let’s get into the process of installing a railing system. Follow these steps to ensure a smooth and successful installation.
1. Planning and Measuring
Before purchasing materials or starting the installation, carefully plan and measure the area where the railing will be installed.
- Measure the length of the space, ensuring accuracy to avoid purchasing too much or too little material.
- Take note of any corners or angles, as this will influence the type of brackets and connectors you will need.
- Ensure that the railing height complies with local building codes (typically 36 to 42 inches for residential structures).
2. Choosing the Right Tools and Materials
Once you’ve measured your space, gather the necessary tools and materials. Some of the tools you will likely need include:
- Measuring tape
- Power drill
- Screws and bolts
- Level
- Saw (if cutting materials to size)
- Post anchors (for securing posts to the ground or deck)
For the materials, you will need the railing system itself (posts, balusters, handrails), which should match your chosen style and material.

3. Installing the Posts
Start by installing the posts, which will act as the vertical supports for the railing system.
- For deck or balcony railings, posts are typically secured to the floor joists or the edge of the deck.
- Use a level to ensure that each post is perfectly vertical.
- Secure the posts using appropriate hardware such as post anchors or heavy-duty screws.
4. Installing the Top and Bottom Rails
After the posts are in place, you can install the top and bottom rails, which run horizontally between the posts.
- Use brackets or connectors to attach the rails securely to the posts.
- Make sure the rails are level before securing them fully.
- Some railing systems come with pre-drilled holes in the rails for balusters, while others require manual installation of the balusters.
5. Attaching the Balusters
Next, install the balusters (vertical supports) between the top and bottom rails.
- The spacing between balusters should meet safety regulations, typically no more than 4 inches apart, to prevent small children from fitting through.
- Depending on the railing system, balusters may be attached with screws or fitted into pre-drilled holes.
6. Securing the Handrail
Finally, install the handrail on top of the railing system.
- Make sure the handrail is comfortable to grip and sits at a height that complies with local building codes.
- Secure the handrail using screws or brackets, ensuring it is stable and can support weight.
7. Finishing Touches
Once the railing is fully installed, check all connections to ensure they are secure. Apply any finishes or sealants as needed (especially for wood railings). For metal and glass railings, ensure that any sharp edges are smooth to the touch.
Maintenance Tips for Railings
After installation, proper maintenance is key to ensuring the longevity of your railing system. Here are some tips for maintaining different types of railings:
- Wood Railings: Regularly inspect for signs of rot or insect damage. Re-stain or paint every few years to protect against moisture.
- Metal Railings: Check for rust and repaint any affected areas. Aluminum and stainless steel require less maintenance but should still be cleaned regularly.
- Glass Railings: Clean glass panels with a mild detergent and a soft cloth to prevent scratches. Inspect the hardware to ensure it remains secure.
- Cable Railings: Check the tension of the cables periodically and tighten as needed. Clean cables to remove dirt and grime.
Conclusion
Railing installation is an essential part of ensuring the safety and aesthetic appeal of your home. Whether you’re installing railings for a deck, staircase, or balcony, it’s important to choose the right materials, follow proper installation procedures, and maintain your railings to ensure they stand the test of time.


